For durability, you want a feather that's not too soft, so that you won't be resharpening it every ten minutes. You also want one that's not too flexible; if it is too bendy it will feel more like a paintbrush than a pen, which is sort of annoying - and not too thin, so that you can grip it comfortably. Primary flight feathers are good for quills. Secondaries aren't so bad either, so long as they're big enough. Other feathers tend to be too narrow.
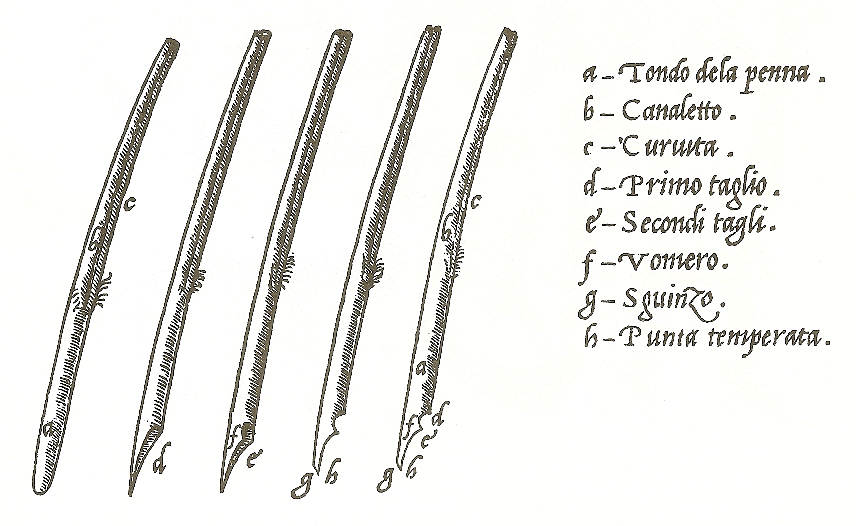
When I'm cutting a quill the first thing I do is chop off most of its length and all of the fluffy bits, so that what remains looks a lot like...a pen. Surprise. Then I soak it in water for ten minutes or so, which makes the next stages easier: chop off the very tip, use a small crochet hook to pull all the crud out from the inside. scrape the membrane off the outside, and roughly shape the end so's it looks like a nib.
Then sometimes I temper it, but not always because I haven't got this down reliably yet, and sometimes it doesn't seem to make a lot of difference. The idea with tempering is to dry the natural moisture out of the feather, so that it will stay sharp longer, by judicious application of heat, chemicals, and/or time.
Then I cut the channel up the middle. The channel is super-clever. It works like the bristles on a paintbrush, to hold a small supply of ink and let it out as needed. If you don't have a channel you can write maybe one or two letters before you have to get more ink. With a channel, you can write at least four or five, and maybe twenty or thirty. People brought up on ballpens and fibre-tips usually think the channel means the nib is broken.
I use a razor blade to cut my channels, but other people swear by knives or by squeezing the feather till it cracks. You do what works for you.
Then I use a scalpel to do the fine-shaping of the nib. A proper proper scribe would use a pen-knife, which they would sharpen periodically. I'm rubbish at sharpening knives, and a knife made of really good steel is expensive, so I use surgical scalpels, which are very sharp for a short time, but aren't designed to stay sharp so I have to keep replacing the blade. I feel a bit bad about this.


 Often you notice it first thing in the morning. Overnight, your quill dried out a little, and the semiquills pulled apart a bit.

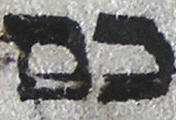
 This technique frequently does the trick: turn the quill over, and apply pressure as shown. The semiquills are pushed back together, and as long as you aren't too hard on them, they'll stay that way.
 Sometimes it's just that the pen is taking a while to get going. So when your quill is doing this, the first thing is not to panic. Don't (I see this a lot) start dabbing frantically at your parchment with those little, fast, darty strokes beloved of certain kinds of artists. This sort of calligraphy needs to be slow and controlled. If you calmly keep going, or just try again, often enough it'll sort itself out. You can see in the image here that it got going after a couple of millimetres, and all I needed to do was go back over the beginning bit.
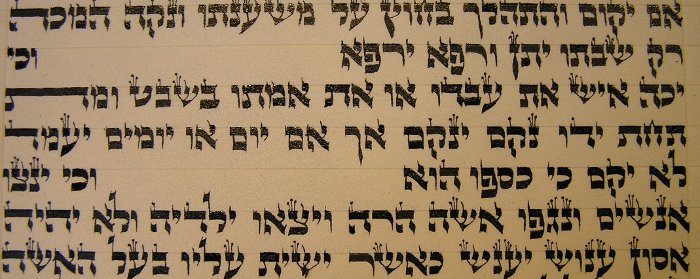
 The sulks can often be dispelled by making a tiny vertical stroke before embarking on the horizontal line. The image at left is a suggested stroke order for writing letter khaf (scanned from Likut Sifrei Stam, the scribes' handbook), and you can see how each horizontal stroke is started with a tiny vertical stroke.
 You barely even need to move the quill, really, but if you do, you get a nifty little twiddle (note technical language). This is another example of necessity becoming a feature of writing - quill writing is easier if you start strokes with tiny vertical lines, and they look rather good (see right), so the little vertical lines become part of the style.
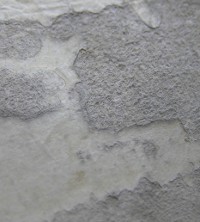 Parchment surfaces vary in texture. Sometimes it can be very very smooth, sometimes rough and sandpapery, and anything in between. The image at right is an extreme example, not from this Torah at all. It's a very close zoom, so you can see the marked difference between rough and smooth.
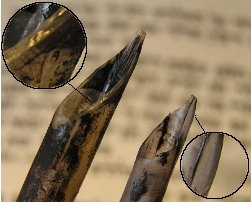 In general, for this Torah, I've been using just an ordinary sort of quill; turkey, not especially remarkable in any way. But occasionally there's been a rougher patch, and for those I've switched to a sturdier quill. Why not use the sturdy one all the time? I just don't feel like it, like I don't wear hiking boots all the time. You can if you want.